In my last post I Suck at Git I mentioned that I’d post some other git-gotchas in the future. I love this workflow, courtesy of Colin, my goto for all things git.
Have you ever made changes to files in an existing git project, committed them, and realized you intended to commit the changes to a different branch?
I have
Here is the scenario. At Ello, we use a simple branching model. You’re probably familar with it. master is kept clean, ideally only production ready code sees the light of master. When working on bug fixes or features we create topic or feature branches. A typical flow starts with a fresh pull from master.
12
git co master
git pull
Followed by creating a feature branch.
1
git co -b sd/feature/make-america-great-again
Next, all the code that Makes America Great Again is written, the tests are written, they’re submitted as a pull-request, reviewed, updated, and finally submitted for acceptance testing, approved and merged.
This is the typical flow. It works great. Most of the time.
But what if someone (finger pointed at myself) gets a little ahead of himself and forgets to create a topic/feature branch? What if they write some tremendous code and immediately commit it directly to master?
After realizing that there are two commits in master that I intended to commit to sd/feature/make-america-great-again I need to fix things. It turns out that the fix is pretty simple. There are several approaches to the problem but I really like this one.
create a new branch
checkout master
git reset HEAD~ the requisite number of times
move on with your life
After executing the offending commits.
123456
git co -b sd/feature/make-america-great-again
git co master
git reset HEAD~ // undoes the most recent commit, leaving the modified changes on disk
git reset HEAD~ // undoes the next commit, leaving the modified changes on disk
... do what you want, git stash is a reasonable idea
git co sd/feature/make-america-great-again // now you have the commits on the originally intended branch
Crisis overted. Thats pretty much it. You’re now in the position you inteded to be in the first place. Working on a feature branch, having commited a couple of changes. No harm, no foul.
The other day, at work, I got myself into GIT trouble. This happens once or twice a year. I’ll get clever, attempt something above my git pay grade, foul things up royally, and eventually call in an expert. Often times this is Jay. In this case it was my co-worker Colin.
What did my git fat fingers screw up?
I’m so glad you asked. Apple recently released Xcode 8. A requirement of using Swift and Xcode 8 (out of the box) is that your code must be Swift 2.3 or Swift 3.0. Up until the move to Xcode 8 Ello’s iOS codebase was written in the production version of Swift, 2.2. Like a good git citizen, I created a topic branch from master named sd/swift-2-dot-3. Brilliant. No problems yet.
The conversion of over 50k lines of Swift 2.2 to Swift 2.3 ended up being a bigger task than originally planned. Not entirely surprising but we had other “real” work to do. We decided to branch off of sd/swift-2-dot-3 for all feature work happening at the same time. For example, when adding Awesome Widget we’d simply git co sd/swift-2-dot-3 followed with git co -b sd/feature/awesome-widget.
No big deal
During the conversion process we needed to push a hot fix for a bug found on a version of the app that was based off of the Swift 2.2 master branch. We made the change, submitted a build to the AppStore and continued working on Swift 2.3 features.
Horror
The problem came when I decided to rebase sd/swift-2-dot-3 onto master. Bad Sean. I’ve been told by many people, Colin included, that I should not be rebasing. Ever. I like rebasing because I want my commits to come after all the vetted commits in master.
Folks like Colin say that rebasing is not in the spirit of git. I’m pretty sure he sent me a Linus Torvalds rant echoing the same. Spirit schmirit. Another argument for not rebasing anything public, and the one that actually matters to me, is that it can create an ungodly mess. I now agree with this wholeheartedly.
Back to my blunder
The negative effects of my rebasing sd/swift-2-dot-3 onto master were not immediately apparent. We eventually merged several pull requests into sd/swift-2-dot-3 and planned to distribute an internal TestFlight build of the app. Before I sent it live Colin messaged me in Slack.
Uh oh
I hadn’t even noticed.
The issue ended up being (we think) that Github’s pull requests (a GitHub feature, not a git feature) lock the base branch to merge into directly to an individual commit, not to the branch. Rebasing sd/swift-2-dot-3 onto master does not change the commit that My Awesome Pull Request will be merged into if the pull request was created prior to the rebase. This should have been obvious but it wasn’t. The pull request merge will continue to be merged into the original commit associated with the base branch, sd/swift-2-dot-3 in this case. It will not be merged into the completely rewritten commit history of sd/swift-2-dot-3 as it exists after the rebase. It gets merged into a commit that is no longer relevant to the rebased branch. This effectively orphans the merge.
Moral of the story
Don’t rebase anything other people are working with. Especially don’t rebase a branch that has other un-merged branches off of it. You’ll feel stupid and make a ton of extra work for yourself, or for Colin since he is the one who will inevitably end up fixing it for you when you stare at your screen in horror.
How to fix it?
git cherry-pick is your friend here. We ended up identifying each missing commit and cherry picked them (in original order) into a new branch created from master which had the merged sd/swift-2-dot-3 code. Then we submitted a new pull request for all of the open-source world to see :).
I’ve fought Colin on the whole “rebase vs merge” debate for a long time. I took my licks on this one. I have a few other git-gotchas to talk about in the future. Believe it or not, this is not my first (or last) time sucking at git.
/* Experiment that animates a red square left to right in a container by swapping the priority of the left and right layout constraints*/importUIKitimportXCPlaygroundletcontainer=UIView(frame:CGRectZero)container.backgroundColor=.cyanColor()container.translatesAutoresizingMaskIntoConstraints=falseletinner=UIView(frame:CGRectZero)inner.translatesAutoresizingMaskIntoConstraints=falseinner.backgroundColor=.magentaColor()container.addSubview(inner)letinnerWidth=NSLayoutConstraint(item:inner,attribute:.Width,relatedBy:.Equal,toItem:nil,attribute:.NotAnAttribute,multiplier:1.0,constant:200)letinnerHeight=NSLayoutConstraint(item:inner,attribute:.Height,relatedBy:.Equal,toItem:nil,attribute:.NotAnAttribute,multiplier:1.0,constant:200)letcontainerWidth=NSLayoutConstraint(item:container,attribute:.Width,relatedBy:.Equal,toItem:nil,attribute:.NotAnAttribute,multiplier:1.0,constant:500)letcontainerHeight=NSLayoutConstraint(item:container,attribute:.Height,relatedBy:.Equal,toItem:nil,attribute:.NotAnAttribute,multiplier:1.0,constant:300)lettop=NSLayoutConstraint(item:inner,attribute:.Top,relatedBy:.Equal,toItem:container,attribute:.Top,multiplier:1.0,constant:50)/* 1. Pin the leading edge of the pink box to it's container. Set it's `priority` to 999.*/letleft=NSLayoutConstraint(item:inner,attribute:.Leading,relatedBy:.Equal,toItem:container,attribute:.Leading,multiplier:1.0,constant:0)left.priority=999/* 2. Pin the trailing edge of the pink box to it's container. Set it's `priority` to 998. */letright=NSLayoutConstraint(item:inner,attribute:.Trailing,relatedBy:.Equal,toItem:container,attribute:.Trailing,multiplier:1.0,constant:0)right.priority=998NSLayoutConstraint.activateConstraints([innerWidth,innerHeight,containerWidth,containerHeight,top,left,right])// animate the inner square left -> right -> left// by swapping the left and right constraint prioritiesfuncanimate(){UIView.animateWithDuration(1.0,animations:{letprevRight=right.priorityletprevLeft=left.priority/* 3. Swap the priorities of the two constraints in the animation block */left.priority=prevRightright.priority=prevLeftcontainer.layoutIfNeeded()},completion:{if$0{animate()}})}animate()XCPlaygroundPage.currentPage.needsIndefiniteExecution=trueXCPlaygroundPage.currentPage.liveView=container
The iOS app constitutes the largest codebase in the Ello ecosystem right now – at 57,391 lines of Swift, it just barely edges out the 55,911 lines of Ruby in our Rails backend, and it’s almost twice as big as the 29,827 lines of JS in our React webapp.
We’ve wanted to do this for many months and finally found the time to get the repository into public form. I hope it’s as useful of a resource for others as the other great open source projects have been for me. Jay Zeschin and I posted about it on Ello today. You can read the full post here:
https://ello.co/sean/post/eobkyhj79p8yzol7it_1ew
Any time a blog post, colleague or programming book uses big O notation I glance at it, record some general impression of the function/algorithm’s performance and move on. I know that big O notation describes how the rate of computation time changes as the input size grows. Or more simply put, big O communicates the efficiency of a function. What I’ve been missing are the specifics about how an algorithm’s big O notation is calculated and when one algorithm is more preferable to another.
Big O describes the efficiency of an algorithm when it operates on an arbitrarily large set of data and describe a ‘worst case’ scenario. Often times the performance characteristics of an algorithm are different for smaller sets of data.
At the most efficient end of the spectrum are constant time algorithms. These are functions that (basically) take the same amount of time regardless of the input size. Constant time is expressed as O(1). The following example is a constant time function because hash-based lookups in Swift do not require enumeration over the entire collection.
12345
// hash-based lookups on a swift dictionary are O(1) funcage(name:String)->Int?{letnames=["jane":30,"john":25,"sam":19]returnnames[name]}
Another very common notation is linear time which is represented as O(n). A linear algorithm’s execution time grows linearly with the size of it’s input. This simple array lookup has a complexity of O(n) because it (potentially) requires enumerating the entire collection to produce a result.
1234567891011
// enumerating a simple swift array is O(n) // there are more efficient ways to write this codefuncageFound(age:Int)->Bool{letvalues=[30,25,19]forvalueinvalues{ifvalue==age{returntrue}}returnfalse}
Quadratic time, written as O(n2) describes an algorithm that grows quadratically. Increasing the input size by a single unit increases the workload by an order of magnitude. The easiest way to visualize O(n2) involves a loop nested in a loop. For each element in the outer loop the algorithm must loop through every element in the inner loop.
123456789101112
// printing out all the combinations of two arrays of strings is `O(n2)`// suits and ranks taken from the excellent book `Advanced Swift` by // Chris Eidhof and Airspeed VelocityfunccombineSuitsAndRanks(){letsuits=["♠︎","♥︎","♣︎","♦︎"]letranks=["J","Q","K","A"]forrankinranks{forsuitinsuits{print(rank+suit)}}}
O(log n) describes logarithmic time. An algorithm that can repeatedly subdivide the work in such a way that doubling the size of the data does not double the amount of work required to complete the algorithm. The commonly cited example of O(log n) is a binary search. Wayne Bishop’s “Swift Algorithms & Data Structures.” and Chris Eidhof and Airspeed Velocity’s “Advanced Swift” both have great implementations of binary search in Swift.
Knowing the performance characteristics of the code we write allows us to objectively evaluate and improve it. Big O can be a helpful tool for us to make decisions about our own code as well as 3rd party code that we use in our apps.
There are many more examples of big O notation, linearithmic timeO(n log n), cubic timeO(n3), exponential time2poly(n), factorial timeO(n!), polylogarithmic timepoly(log n), etc.
See anything that looks wrong? Please let me know. I’m intending to write a handful of posts about subjects that require me to do some research in order to write (semi) intellegently about them so I won’t be sore if you correct my mistakes 😜.
Since starting the Ello iOS app I’ve been writing Swift 99% of the time. Its not yet as natural as Objective-C to me but the benefits are obvious. A concise syntax with ALL types as first class citizens has removed a lot of the primitive/object song and dance required in Objective-C. I knew I’d love Swift’s syntax and type system. What I’ve been surprised by, and excited by, are Swift’s functional features. Most of the interesting exploration and writing about Swift has come from the Functional programming community. I have to admit that almost all of the functional programming concepts are new to me. Like most Objective-C developers I come from a world of strict object orientation and an imperative programming mindset.
This new (to me) functional approach has opened up a world of new techniques and tools I’m convinced will make my code easier to maintain and less error prone. The takeaway for me so far is that functional programming’s primary benefit is removing as much concern about state as possible while focusing on the WHAT instead of the HOW.
Managing state is one of the most common problems we encounter when building a reasonably sized application. It starts out simple at first. An instance variable here, another one over there. State instance variables are cheap and convenient. They help you solve an immediate problem and allow you to get back to the function or task at hand. The problem is that they introduce huge complexity as a system grows. Their intended usage and area of influence becomes unclear. A bit like the story of the boiling frog they add complexity little by little over time. Before you’ve recognized it the application is in big trouble. The problem is that if they’re not rigorously maintained they can add untold hours of development to the life of an application.
Functional programming favors immutability over mutable objects. At first this seemed wasteful to me. Why create something new each time when I already have an available object. Turns out that the stability of data structures not changing is usually worth the small trade off of allocating a new one.
I recently came across Rob Napier’s slides from his talk “Introduction to functional programming in Swift” from CocoaConf Atlanta 2014. Its a great set of slides that I encourage you to read if you’re interested in a more in depth look at functional concepts and motivations. The example below is a simple example of using Swift’s map function in place of the traditional for loop.
This code is a simplified version of code we have in the Ello app. Posts represent a user’s post. Regions are sections of content in a post. Our goal is to create an array of String types, each containing the content for an individual region. Simple enough.
An array of strings using the imperative for loop. We pass in an array of posts, loop over them, inner loop over their regions and append each region’s content property to a temporary array and return it.
This is slightly contrived and unlikely to appear in the wild (hopefully) but it illustrates the most imperative way we can solve the problem. Most of the syntax is focused on the how. We have three temporary variables regions, i and j, subscripting, lots of the machinery is exposed.
Lets solve the problem using Swift’s Array.map function. map enumerates the array handing your function one element from the array. You do whatever you want with the element and hand back the type you specify as the return value. Here we map over posts and for each post in posts we map over it’s regions. For each region we return it’s content property. Notice the use of the join function. join is a handy function most commonly used to convert an array of strings into a single string. In this case we use it to turn an array of arrays into a flattened array.
The functional approach uses no temporary variables and focuses on the what rather than the how. In this case it’s more succinct as well.
These concepts are definitely Functional Programming 101 (or maybe even a pre-requisite) but they’re easily understandable and were my gateway drug into more sophisticated functional techniques. I’m still a strong believer in object orientation and intend to remain one but functions like map are fantastic new tools we can use to make our Swift code more readable, safer and less error prone.
I consider myself a n00b when it comes to functional thinking. Our backend counterparts in the ruby world have used these techniques for years. My goal is to find situations where I can challenge my existing mode of imperative problem solving with a functional approach. I’m convinced my code will be more stable, more readable and more portable. Plus, this stuff is just plain fun.
The recent launch of Orion got me thinking about space exploration. The nostalgic notion of the whole country excited about putting a man on the moon. I decided to learn more about it and started reading Apollo. Coincidentally Carrie gave me an early stocking stuffer, The Martian a fictional story about an astronaut stranded on Mars during an Ares space program mission. I plowed through the book and am now back to reading the much longer, and denser non-fictional history of the Apollo program. The space program is fascinating. Full of big personalities and huge ambition. The scale of the technical challenges they overcame is inspirational to me. The coordination of such an immense project is hard to grasp.
While my work on iPhone apps is but a fraction of the scale I think there are a lot of lessons that apply.
Failure and the process of investigating failure is as much a part of the engineering process as succeeding. Fixing a bug or spending the time to figure out a challenge is very valuable, not a waste of time or effort.
Discipline is a lost art. My number one goal for the new year is a renewed effort in self discipline and focus. Some aspects of programming are tedious but they are essential to a quality product.
Along those lines: Technical Journaling could be especially useful for my poor memory. This entry is the first in my attempt to capture and organize my thoughts. I plan to document my problem solving and daily progress. I ordered a Moleskin Evernote edition with the hopes of retaining much more of my daily thinking through the act of physically writing it down. Being able to scan it in addresses my concerns about it not being searchable and backed up.
I plan to post as much of my journal here as possible. If you’d rather follow along without all the other Ello posts of mine I’ll have it on my blog, seancdougherty.com as well.
This year was a big year for developers on Apple’s platforms. Apple announced a ton of great stuff at WWDC. The most exciting news was their announcement of a new programming language, Swift.
“Swift is a new programming language for iOS and OS X apps that builds on the best of C and Objective-C, without the constraints of C compatibility. Swift adopts safe programming patterns and adds modern features to make programming easier, more flexible, and more fun.”
Swift is intended to be a near complete replacement for Objective-C, the language iOS and OS X apps are currently written in. While most of us love programming in Objective-C we realize that it has some rough edges. Objective-C has been around for decades and does not have a lot of the features and syntax more modern languages have introduced. Swift brings a host of modern features such as generics, tuples, closures, pattern matching and type inference while remaining safe and most importantly, fast. Swift is compact and expressive which will lead to apps requiring less code and being easier to maintain.
I predict that Swift’s approachable and familiar syntax will lead to an influx of new Cocoa and Cocoa Touch developers. These new developers will bring new ideas to the platform. I can’t wait to see what will happen over the next few years. We are going to move in directions we haven’t yet conceived of. Its an exciting time to develop for iOS and OS X. As Mattt Thompson put it “How neat that we’re all beginners at the same time though, right?”
Getting Started
Swift requires Xcode 6 beta which at the time of this writing is pre-release software. In order to download it you’ll need to be a member of the iOS Developer Program or Mac Developer Program.
Once you have Xcode 6 beta or later up and running you can start writing and compiling Swift.
In an actual application deployed to iOS devices or a Mac Swift files have a .swift extension. They can be compiled along side Objective-C, C and Objective-C++ code. Objective-C code can use Swift classes (with some restrictions) and vice-a-versa.
When conceiving Swift the authors at Apple had a goal of making learning Swift and trying out the language as easy, interactive and fun as possible. They named what they came up with Playgrounds.
Playgrounds
Playgrounds are files with a .playground extension. When opened in XCode 6 they launch an interactive environment for you to experiment with Swift code. Playgrounds are the quickest and easiest way to start writing Swift. They are a bit like Ruby’s irb but much more powerful. Results are displayed immediately in a column on the right and through a powerful feature available in other areas of Xcode you are able to visualize several sophisticated types. It is even possible to see the results of values changing in your Swift code over time. There really is no way to do playgrounds justice here. You have to interact with one to understand how awesome they are.
In fact, Apple has created a playground called “GuidedTour.playground” which is a comprehensive and interactive playground that goes through most of Swift’s language features with descriptions and live examples that you can play with and modify on the fly. The iOS Developer Library has a Swift Tour (you’ll need a valid Apple developer account to access it). Click on Swift.playground.zip to download a zip archive containing a playground file with all the code in this post.
Basics
Everyone is a first class citizen in Swift
Strings, integers, doubles, classes, structs, enums and even functions are all valid types. Gone are the distinctions between primitives and objects. All types can be stored in collections and extended. The first classifying of all types provides a concise and uniform approach to developing in Swift.
Variables
Swift is able to infer type information in most cases so specifying it is not required if a value is assigned by the expression.
12345678910111213
// Swift knows this is a string because the right hand value is a stringvarname="Walter"// variable and constant types are specified after the name and a colonvarlastName:String="White"varage=1// inferred to IntvarexplictAge:Int=1// explicitly set to Intvarcount=1.0// inferred to DoublevarexplicitCount:Double=1// force to an int
Constants
The Swift documentation favors immutability so constants are highly visible in the language. Constants are indicated using the let keyword in place of var.
1234567
letimmutableName="Walter"// an immutable string constant// immutableName = "Walter White" // won't compilevarmutableName="walter"// a mutable string variablemutableName="Walter White"// works
String
Strings are concatenated with the + operator. They can be added to with the += operator. Strings can also interpolate other calculated values using a backslash followed by the expression in parenthesis \(expression).
12345
varnameDescription="Walter"nameDescription+=" White"// name = "Walter White"letyearsOld=50nameDescription+=" is \(yearsOld) years old"// name = "Walter White is 50 years old"
Collections
Swift has several collection types. The most common are Array and Dictionary. Just like strings and the number types they are mutable if they are variables and immutable when they are constants.
Array
Arrays are typed in Swift.
12
varintegers:Int[]=[1,2,3]integers+="non integer"// will not compile
If the type can be inferred the type information is not required at declaration time.
12345
varcharacters=["Jesse","Walter","Hank"]// inferred as an array of stringscharacters+="Skyler"// add a string to the arraycharacters[2]// "Hank"
Dictionary
1234567891011121314
varstates:Dictionary<String,Int>=["Colorado":5000000,"Hawaii":1000000]varshows=["Walter":"Science Teacher","Jesse":"Unemployed","Hank":"DEA Agent"]// type inferred to a key type String and value type Stringshows["Jesse"]// "Unemployed"shows["Skyler"]="Accountant"// add an element to the dictionary
Control Flow
Swift has most of the familiar mechanisms for controlling flow that Objective-C developers are familiar with. They’re just a lot cooler and more useful in Swift.
varregistered=trueifregistered{// if statements do not require parenthesis// but they do require curly braces}// Swift has range types that are enumerablefornumberin5...10{println("\(number) plus \(number) is \(number + number)")}letbreakingBadCharacters=["Jesse","Walter","Hank"]forcharacterinbreakingBadCharacters{println("\(character)")}// a string's characters are enumerableforletterin"Breaking Bad"{println(letter)letter}varfunds=0whilefunds<10{// cook meth until broke is falsefunds++}do{// cook meth at least oncefunds++}whilefunds<100
Dictionaries are enumerable as a key value tuple pair. More on tuples below.
123456789
letcast=["Walter":"Science Teacher","Jesse":"Unemployed","Hank":"DEA Agent"]for(name,profession)incast{"\(name) is a \(profession)"}
Switch
The coolest and most powerful control flow mechanism in Swift is the switch statement. Swift’s switch statement works with any type compared to Objective-C’s integer only switching. Swift switch allows for pattern matching, a powerful feature new to iOS and OS X development.
Switch statements must be exhaustive so a default is required if the case statements don’t handle all possible cases. Execution does not fall through case statements so no break keyword is necessary.
1234567891011121314
letfullName="Walter White"varoutput=""switchfullName{caseletxwherecountElements(fullName)>3:output="more than 3 characters long"case"Jesse","Hank":output=fullNamecaseletxwherex.hasSuffix("White"):output="ends in White"default:output="no matches found"}output// "more than 3 characters long"
Functions
Functions are types just like everything else in Swift. You can define them, call them, as well as pass them as arguments to another function and return them from other functions. Functions are defined using the func keyword. They accept 0 or more arguments and may return a value. A function returns a value with a -> and type after the parentheses.
In order to remain compatible with Cocoa and Cocoa Touch function arguments can have an external name as well as an internal variable name. Lets look at a UITableViewDataSource protocol method in both Objective-C and Swift.
12345678910
// Objective-C-(UITableViewCell*)tableView:(UITableView*)tableViewcellForRowAtIndexPath:(NSIndexPath*)indexPath;// Swift// notice that the first argument does not have an external name// while the second argument is named cellForRowAtIndexPath externally// and indexPath internallyfunctableView(tableView:UITableView!,cellForRowAtIndexPathindexPath:NSIndexPath!)->UITableViewCell!
The Cool New Hotness
The language features below are either completely new compared to Objective-C or they work in ways novel enough to note here.
Optionals
As I mentioned above, Swift is designed to be safe. Optionals help keep code safe by forcing the developer to be explicit about variables and constants. By default all variables and constants must have an assigned value. This ensures that it is safe to use variables and constants without first checking to see if they have a value. However, sometimes we’ll need optional value variables or constants. This is where Swift Optionals come in. Optionals are a formal language feature that marks a variable or constant as potentially having no value. To mark a variable or constant as optional use a ? after the type.
When using an optional variable or function with an optional return value we must explicitly unwrap the value held by the optional using a ! after the referenced optional.
1234567891011121314
content="Some content here"content// compile errorprintln(content!)// compiles but may introduce a run time crash if content is nilifcontent{println(content!)// safe because optionals are true if they have a value}// automatic unwrapping with if let shorthandifletsafeContent=content{safeContent// preferred handling of optionals}
Tuples
Tuples are a group of compound values. To create a tuple enclose multiple values in parentheses. They can contain any number of values as well as any combination of types. The values can have names or not. Tuples are the mechanism for returning more than one value from a function. Access values in a tuple by position or name.
Structs are similar to classes in Swift with the distinction that they are immutable by default. They are copied when passed in code. Classes are passed by reference.
Generics are a powerful tool for code reuse. They abstract code and provide flexibility while maintaing compile time type safety. Under the hood Swift uses generics for a host of the standard library features including collections like Array and Dictionary.
The Swift Programming Language has a great example of generics. The example is a simple Stack. In order to make the stack work with with any type generics are used. The stack is type safe but flexible enough to hold any type.
1234567891011121314151617181920
structStack<T>{varitems=T[]()mutatingfuncpush(item:T){items.append(item)}mutatingfuncpop()->T{returnitems.removeLast()}}varstackOfStrings=Stack<String>()stackOfStrings.push("uno")stackOfStrings.push("dos")stackOfStrings.push("tres")stackOfStrings.push("cuatro")// the stack now contains 4 stringsstackOfStrings.push(123)// won't compile because 123 is not a String
Extensions
Extensions allow you to add functionality to existing types. They are similar to Objective-C’s categories and Ruby’s Modules. Unlike an Objective-C category a Swift Extension can extend classes, structures and enums. Extensions can also add computed properties and add protocal conformance to an existing type. Extensions are available app wide at compile time.
Swift Protocols are similar to protocols in Objective-C but like their Extension counterparts they available on all types. Protocols are similiar to Java’s Interfaces. When a type adopts a protocol it is conforming to a contract defined by the protocol. Protocols define optional or required functions and/or properties. The best new feature of protocols in Swift are protocol instance properties. Protocols do not define the implementation of their functions or properties, concrete types conforming to the protocol implement all required functions and properties.
1234567891011121314151617
protocolHighFiveable{varnumberOfHighFives:Int{get}funchighFive()}classPerson:HighFiveable{varnumberOfHighFives=20funchighFive(){println("I was high fived!")}}letjim=Person()jim.highFive()// "I was high fived!"
Summary
I’ve included all of the code snippets above in a playground file you can download and open up in Xcode 6 beta or greater.
This is just a brief look at some of the key language featuers of Apple’s new programming language, Swift. Reach me on Twitter @sdougherty if you find any errors or have anything to add.
Apple’s annual World Wide Developers Conference was held in San Francisco over the past week. It turns out that 2014 was a great year for first time attendees like myself and my fellow iOS developer co-worker David Nix @dave_nix. GoSpotCheck was lucky enough to get two tickets in the Apple lottery (at a pretty price of $1600 each) and graciously sent David and I to soak up all the new Apple goodness. Between the two of us we were able to attend a wide range of sessions and events. This post is a team effort. We have taken the time to compare notes and put together what we feel are the key takeaways from WWDC 2014.
Developers! Developers! Developers!
If WWDC 2013 was all about users, 2014 was all about developers. While iOS 8 and OS X 10.10 have lots of great new features for end users these pale in comparison to the sheer volume of new and improved tools Apple made available to their millions of iOS and Mac developers. The general opinion we heard around Moscone was excitement and approval. We couldn’t agree more.
The biggest news for us (by far) was the introduction of a new programming language, Swift. Swift is a modern, concise, expressive and safe programming language that is the future of iOS and OS X applications. There was a collective gasp from 5000+ developers when Swift was announced at the keynote. The rest of the week was all excitement as one developer after another decided what a great addition Swift is to the Cocoa and Cocoa Touch communities.
Big takeaways
This was the biggest WWDC for developers since 2008 (the introduction of the App Store for the iPhone 3G).
Swift is available in iOS 7 or greater so supporting iOS 6 is a no go. Hint: We really want to use Swift.
A little taste of the goodness
Lets loop through the range of 1…5 inclusive and print out some calculations on index
123
forindexin1...5{println("\(index) times 5 is \(index * 5)")}
Replace indexes 2, 3 and 4 in our friends array
1
friends[2...4]=["John","Anna","Henry"]
Use a tuple to return multiple ages of our friends
This is just a small taste of the compactness and expressiveness built into Swift. For a more detailed look into the language download “The Swift Programming Language” in iBooks.
The new debugging features in Xcode are amazing.
Swift plays well with ObjC (and vice versa). An incredible feat by Apple.
Apple hates the “hamburger” menu, and we agree with them.
Remember, everything really cool in iOS 8 will (probably) not be usable with iOS 7.
Testflight will be integrated. No more device ids needed! Just apple ids. (It’s based on per user, not on per device.)
No more calculating tableview cell heights or collectionview cell sizes! (iOS 8 only though)
A lot of the new iOS 8 user-facing features are already present in Android. Whether or not Apple does this better than Android remains to be seen.
Xcode playgrounds are incredible. Totally changes the way we code in Swift (for the better). It’s like irb or pry on steroids.
Apple is pushing for more interactive UI (think Facebook’s Paper).
A big theme at the conference was adaptability. It is clear Apple is planning for more devices and potential screen dimensions. A lot of the new UIKit APIs are geared towards making application user interfaces work at any size. Becuase of this many of the explict references to iPad, iPhone and specific device orientations (portrait or landscape) are disappearing from the language. In their place are adaptive concepts that aim to communicate relative size such as ‘regular height’ or ‘compact width’. They’ve put a tremndous amount of effort into making adaptive layouts easier to create.
Continuity is anothe concept Apple reiterated. Allowing users to move from device to device picking up where they left off is going to set high quality apps apart.
Prototyping, or making fake apps is a crucial step in the process. Start with the most disposable possible version of an app idea. Use a pen and paper. Come up with lots of ideas. Throw most of them away. Build static, image based versions of the ones that seem promising. Show them to real users. Throw most of them away. Don’t start building a time intensive real app until you have feedback on the fake app from real users. Hopefully this results in a better app, that real users want, with much less effort.
Opinion
We’re curious to see how fast Swift is compared to Objective C. Part of the joy of ObjC is that, even though it is verbose and “ugly”, you typically never have to worry about performance. It is very fast. It was stupid of Apple to compare Swift to Python in the main keynote. Python is an interpreted language, Swift is compiled. It’s like comparing apples to oranges (pun intended). But Apple did have slides saying Swift is faster than ObjC. However, I (David) read an article, which I can’t find now of course, that benchmarked Swift vs ObjC. The article claimed Swift was slower, sometimes by 200x or more. The author was doing things that probably wouldn’t come up in most production apps (i.e. sorting millions of objects). However, only time will tell to see if Swift keeps on par with ObjC.
Swift combined with Xcode’s new debugging features is going to boost programmer productivity significantly. It will give us more time to work on polished (nice to have) features like custom animations or custom UI.
ObjC won’t be going anywhere for a while, but we might as well consider it legacy code. Swift is so much nicer to write. We can see Apple dropping ObjC in the next couple years. They often take an adapt or die methodology.
Several sessions dealt with user interfaces and how to approach designing them, both visual design and information design. Apple continuously reinforced the importance of clear, simple and focused design. An example of poor design, in Apple’s opinion, is the hamburger button. Hamburger buttons interfere with the navigation back arrow, confusing the user. They also open drawers which tend to collect junk just like real drawers. Apple highly recommends tab bars instead of hamburger buttons. Even though tab bars take up screen real estate they greatly increase clarity and tend to get used much more often than hidden hamburger button navigation. We agree that hamburger buttons should go away in most cases.
Mature apps will need to be adaptive. This means having the appropriate content and sizing of that content at all size classes. This also means making our apps handle Adaptive Type, a system wide, user configured setting that dynamically changes the size of type throughout all apps.
Technical Thoughts (targeted for programmers)
Swift has no concept of public/private/protected. It will be the developer’s job to clearly mark methods as public (via a comment) and to only use those methods publicly. However, Apple said access control will be coming to Swift in the future.
The ObjC feature of sending a message to nil and nothing happens has been great for the user in preventing crashes, but tough for the programmer when debugging during development. Swift does not have this feature. At first, we were scared this would lead to “NullPointerExceptions” that are common in Java. However, Swift uses Optional types to address this issue. An optional tells the compiler that a variable may or may not have a value. The compiler, then, is very strict about how you use these values. It also forces you to initialize every variable. You cannot initialize a non-optional variable to nil.
Swift has features very friendly to functional programming. We think we’ll see more and more functional programming paradigms in iOS as time goes on.
Another quick taste of the functional power of Swift.
1234567
// this is not possible in Objective-Cnumbers.map{numberin3*number}// but we can do better, we can shorten it even morenumbers.map{3*$0}
Our summary of the announcements and sessions at WWDC 2014 would be incomplete without a list of highlights. Below are a few of the more significant changes to the tooling, API and end user facing components of iOS and OS X apps.
Tooling Highlights
Swift – a completely new programming language for writing iOS and OS X apps
Swift REPL – a command line interactive shell for running Swift code (similar to irb for ruby)
Playgrounds – realtime environments for trying out code
View Debugging – visual debugging of views and their layout constraints
Universal Storyboards – a single storyboard for all screen sizes
Resizable Simulator – the iOS simulator can be resized to any size
API Highlights
App Extensions – iOS system wide widgets accessible from other apps
UITableView & UICollectionView – automatic calculation of table and collection cell size
Size Classes & Trait Collections – device & orientation independent handling of user interface size changes
Rotation API deprecation – rotation events are deprecated, replaced by size classes
CloudKit – structured, cloud based storage in iCloud
SceneKit – simple 3D engine now available in iOS
TouchID – applications can now access authentication through TouchID on iPhone 5s
UIAlertController – Alert views and Action sheets are now full blown view controllers
UISplitViewController – now availble on iPhone, one uniform controller for handling master/detail content
HealthKit – a framework for managing personal health information
HomeKit – a framework for communicating between home automation devices
End User Highlights
iMessage – SMS is supported in all iMessage conversations
Handoff – users can start an activity on one device and seemlessly transition it to another device
iCloud storage – larger buckets of iCloud data can be purchased
Document Picker – 3rd party cloud storage providers can offer access to all applications
Disagree? Did we miss something? You can reach us both on twitter @dave_nix or @sdougherty. We’d love to hear from you.
Despite what some people think, TDD is alive and well. Fast running tests are awesome and breaking dependencies is the key to fast, isolated unit tests. Reliable tests give us the confidence to aggressively clean our code and add new features.
In iOS and OS X it is common to use singleton or singleton style service objects for app wide functionality. Apple provides several of these singleton service objects that are used in most applications. [NSUserDefaults standardUserDefaults]; and [NSNotificationCenter defaultCenter]; for example.
Both NSUserDefaults and NSNotificationCenter are notoriously painful to isolate in unit tests. NSUserDefaults is challenging because it writes to disk and has the potential of poluting the real running application after the test suite has run and we are back to using the app in the simulator. NSNotificationCenter introduces the possibility of test pollution due to it’s global nature. Wouldn’t it be nice if we had a system to seemlessly inject fake versions of these in our tests?
We do.
At GoSpotCheck we have a mechanism for injecting all of Apple’s as well as all of our own singleton style dependencies. When running in the simulator or on a device the real service objects are injected. When the test target is running fake service objects are injected.
The rest of this post will detail out our approach to dependency injection. To keep things easy to understand the example is intentionally simplistic. The sample project Injections is not organized like our production application and the test suite is XCTest in order to reduce the amount of setup needed to try it out. We use Cedar and Expecta at GoSpotCheck.
The example below shows how to dependency inject a fake AFNetworkReachabilityManager from Mattt Thompson’s fantastic AFNetworking library. AFNetworking is a great network request library for iOS and OS X.
AFNetworkReachabilityManager provides hooks for checking on, and being notified of a device’s internet connectivity. To unit test online/offline conditional behavior in an app we need to be able control (or fake) the AFNetworkReachabilityManager's reported connection status. This example may seem like a lot of code is required to fake the connection status. That using a mocking framework like OCMock might be simpler. It would be. For one off stubbing and mocking OCMock is great. However, in a large production application fakes are usually a better choice in my opinion. Application state is more straightforward with a system of injected fakes than one off mocking, especially for system wide service objects. These techniques are especially useful when unit testing true service objects that make network requests and return deserialized model objects.
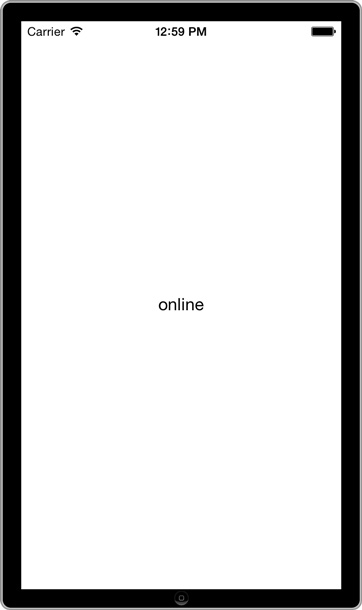
Injections is a simple application that displays the device’s connection status when launched. Follow the setup below to see it in action.
Setup
1
$ git clone git@github.com:steam/injections.git
We’ll be looking at a handful of classes and categories.
Environment is the class that initializes all the services. In a real application you’d see properties for a NSNotificationCenter, NSUserDefaults and all other singleton style service objects here. These will be referenced by the UIViewController+Injections category and made available to all UIViewControllers that want access.
The key part to take note of is -initializeServices. We call [self isTestEnvironment] to determine if we are in the test environment. If - (BOOL)isTestEnvironment returns true then we initialize fake services, otherwise we initialize the real reachabilityManager.
The magic happens with [self respondsToSelector:@selector(initializeFakeServices)]. In the non-test target this will return false. In the test target it will return true because of the Environment+Fake category imported in ViewControllerTests.m.
Environment+Fake sets [FakeReachabilityManager sharedManager] as the value for self.reachabilityManager. We’ll see below that ViewController will use the fake version of self.reachabilityManager in the test target while using the real reachabilityManager in the non-test target.
The UIViewController+Injections category is in charge of defining methods that returns each of the services we want to expose to our view controllers. In this case reachabilityManager is returned from the Environment singleton object. This method will return either the real or fake version of the reachabilityManager depending on the target.
ViewController uses the reachabilityManager to determine what text to display to the user. If self.reachabilityManger.networkReachabilityStatus is reachable the label’s text is set to “online”, if not then it is set to “offline”. Take note of the @property (strong, nonatomic) AFNetworkReachabilityManager *reachabilityManager; declaration in the header as well as it’s corresponding @dynamic reachabilityManager; in the implementation file. All UIViewController subclasses have access to the UIViewController+Injections category methods which allows them to be set as properties on each ViewController subclass and dynamically evaluated at runtime.
ViewController.h
123456789101112
#import <UIKit/UIKit.h>@classAFNetworkReachabilityManager;
@interfaceViewController : UIViewController@property(nonatomic,weak)IBOutletUILabel*internetStatusLabel;/* "Injected" properties -- Each should have a corresponding @dynamic directive */@property(strong,nonatomic)AFNetworkReachabilityManager*reachabilityManager;@end
By calling -setOffline or -setOnline we’re able to override - (AFNetworkReachabilityStatus)networkReachabilityStatus having it return the value of self.fakeStatus set in the -setOffline or -setOnline calls.
#import <XCTest/XCTest.h>#import "Environment+Fake.h"#import "ViewController.h"#import "FakeReachabilityManager.h"@interfaceViewControllerTests : XCTestCase@property(nonatomic,strong)ViewController*controller;@end@implementationViewControllerTests-(void)setUp{[supersetUp];UIStoryboard*storyboard=[UIStoryboardstoryboardWithName:@"Main"bundle:nil];self.controller=(ViewController*)[storyboardinstantiateInitialViewController];[self.controllerloadView];}-(void)tearDown{[supertearDown];}-(void)testOnlineLabelDisplaysOfflineWhenOffline{FakeReachabilityManager*manager=(FakeReachabilityManager*)self.controller.reachabilityManager;[managersetOffline];[self.controllerviewDidLoad];NSString*expectedResult=@"offline";NSString*text=self.controller.internetStatusLabel.text;XCTAssertTrue([textisEqualToString:expectedResult],@"Strings are not equal %@ %@",text,expectedResult);}-(void)testOnlineLabelDisplaysOnlineWhenOnline{FakeReachabilityManager*manager=(FakeReachabilityManager*)self.controller.reachabilityManager;[managersetOnline];[self.controllerviewDidLoad];NSString*expectedResult=@"online";NSString*text=self.controller.internetStatusLabel.text;XCTAssertTrue([textisEqualToString:expectedResult],@"Strings are not equal %@ %@",text,expectedResult);}@end
By toggling our reachabilityManager's online status through the fake we are able to write assertions about the label’s text for both online and offline states.
Summary
Environment handles the setup of service objects.
Environment+Fake sets fake services in the test target.
UIViewController+Injections provides service access to UIViewControllers.
@dynamic accessors makes this possible.
ViewControllerTests.m is able to use the fake service object and control the external dependency.
As I mentioned above, this example feels like overkill for this particular use case due to the simplicity of the app. In practice however this technique makes it possible to have fine grain control over a host of complicated services and objects. When your app has hundreds of classes and thousands of tests you’ll see your hard work paid back many times over. The tests will run fast and predictably (our current test suite takes under 15 seconds to run ~1400 tests). TDD and near complete test coverage can only happen when you have confidence in the test suite and you can execute them fast enough to do it often. Breaking dependencies on asynchronous code and hard to control state is crucial.
Approach this in a different way? Completely disagree? Love the technique? Reach out and let me know on twitter @sdougherty.